Wednesday, 8 May 2013

Eighteenth Century Tailoring

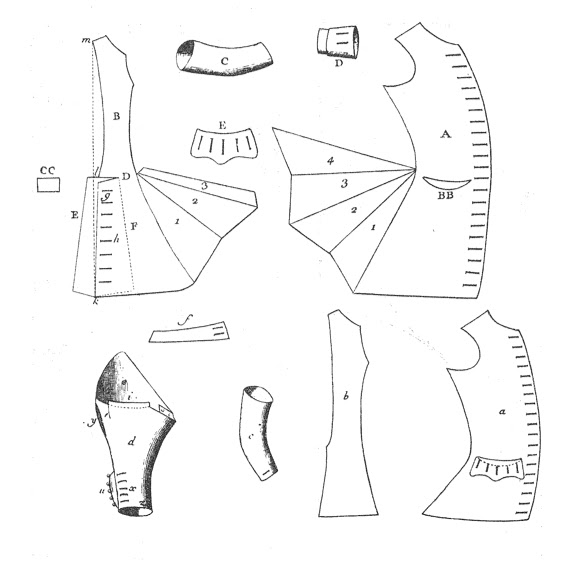
It is said that the first proper analysis on the art of tailoring was called L'Art du Tailleur, written by M. de Garsault. The author describes the whole process of making a coat, from taking the measurements to a detailed account of the making - the stitches used , method of pressing, instruments required etc. It is accompanied by diagrams of patterns illustrating the garments mentioned in the text and show how to place them on material. Apparently several other encyclopaedias were published in France during the second half of the eighteenth century, with the tailoring section always being based on these diagrams and texts from M. de Garsault. The following methods from this text illustrate eighteenth century method of tailoring.


A - Iron
B -Button hole block
C - Seam block
D - Scissors
E - Ironing Cloth

Whats interesting to look at is the different parts of a jacket; the shape of the centre front curved out chest, the armholes are positioned further back for posture, and the sleeves elbow is evidently bent in to a more distinctive shape than what I have been before.

Tuesday, 7 May 2013

Facing


Lining the uniform

A Facing Colour is a common European uniform military tailoring technique where the lining of the standard military jacket is of a different colour to that of the jacket. The jacket lining evolved to be of different coloured material, then of specific hues. Accordingly when the material was turned back on itself: the cuffs, lapels and tails of the jacket exposed the contrasting colours of the lining or facings, enabling ready visual distinction of units: regiments, divisions or battalions each with their own specific and prominent colours. It was especially observed and elaborated on during the Napoleonic Wars.


A more modern approach - Merino for Military Applications

Merino is being tested for greater military use around the world. Wool is a logical choice for military use due to the heat and moisture management, flame-resistant qualities, comfort, odour suppression, ease of care and UV Protection.

Heat and Moisture Management

  • Merino fibre has a hydrophobic (water repelling) exterior and hydrophilic (water loving) interior that confer its unique moisture management properties resulting in enhanced wearer comfort and performance.
  • In contrast to most synthetic fibres, wool has the capacity to remove large amounts (up to 35% of its own weight) of moisture from the skin surface, before the fibre even begins to feel wet.
  • A fabric’s ability to allow the transmission of water vapour through its structure will significantly affect the comfort of the wearer. The ability of Merino fabrics to do this surpasses that of synthetics.
  • The chemical structure of Merino fibre means that it has the ability to absorb and desorb moisture and to gain and release heat depending on the external and internal environment – thus buffering wearers against environmental changes.
  • As it absorbs moisture, Merino fibre releases a small but perceptible amount of heat. In an apparel or hosiery application this prevents the wearer from chilling in wet, cool conditions. In hot conditions the reverse effect occurs, affording a natural means of buffering the body’s microclimate.

Flammability

  • Merino fibre is naturally flame resistant, and its performance exceeds that of all other commonly encountered textile fibres, making it ideal for usage in military and protective services applications.
  • In the unlikely event it does ignite, Merino has a low heat of combustion and a low rate of heat release compared with other textile materials.
  • If Merino comes into direct contact with a burning substance, it won’t melt or stick, and will self-extinguish once the ignition source is removed.
  • Wool forms an insulating char when it burns and evolves less smoke and toxic gases than formed during combustion of most synthetic fibres.

Foot Health and Comfort

  • Managing relative humidity and temperature within footwear and providing cushioning to the feet are key to maintaining foot health and comfort.
  • Wool socks provide a means of managing the foot micro environment, effectively reducing relative humidity and the propensity for blister formation.
  • The natural resilience and bulk of wool means wool socks provide a mechanism for cushioning the jarring impact of the foot during strenuous walking/running activity.
  • Wool socks have been shown to have odour suppression properties far superior to socks made from synthetic fibres or cotton.

Odour Suppression/Ease of care

  • Body odour arises as a by-product of bacteria, which proliferate in warm moist environments (e.g when sweat is allowed to remain on the skin for a period of time).
  • Merino fibre, through its complex chemical and physical structure, resists the development and proliferation of odour to a much greater extent than synthetic materials or cotton.
  • Merino apparel and hosiery is readily laundered to remove soil or other contaminants of potential relevance to health – and efficient shrink resist processes are employed to enable full machine washability.

UV Protection

  • UV radiation reaching earth from the sun can have deleterious effects on human health when overexposure occurs.
  • Merino fibre is a very efficient absorber of potentially harmful UV-A and UV-B radiation.
  • Fabric construction is also a key determinant of the extent to which textiles will protect a wearer from UV radiation.
  • Summer-weight Merino garments have been consistently shown to offer a higher degree of UV protection than similar fabrics constructed of competing materials.

How to Make Jetted pockets by Savile Row Training

hwww.savilerowtraining.co.uk

This really is a great website to browse through for videos and tutorials to helped you develop 'the art of tailoring'. Savile Row Tailor Darren Beaman run this website with the hope of helping others to improve their skills set and understanding of the principles and processes needed to master this craft. I found a great little tutorial on Welted pocket which I knew would ceom in useful for my research and samples.

here are also some interesting videos from the savile row training website:

http://www.savilerowtraining.co.uk/videos/

Today we will look at what goes into making a jetted pocket. It’s very simple yet it takes a long time to get it right. Members with a sewing machine at home, have a go.
First we must mark the size of the pocket, this is done by the tailor (unless the cutter or customer has asked for a measurement).
As a rule the pocket will be from 6 to 7.1/2 inches , the tailor will look at the size of the jacket and mark where he thinks would be ok for the garment.

Let’s start

A strip of linen 8.1/2 inches by 3 inches


 A strip of cloth (this will be the jetted pocket).


The front of the jacket, where the pockets are going into.


Mark the size of the pocket (here is 6 1/2 inches).


Ok we have now marked the pocket size, we need to prepare the rest, so that we can sew the cloths together.
We need to place the linen behind the main cloth (wrong side of the cloth), over the marked pocket as seen below.


You need to sew the linen as shown below to hold in place.


Then turn the cloth over, so you can see the right side of the garment.
We can now place the small piece on as shown below, making sure that we leave at least 1 inch either side of the pocket size. As shown below.


You now need to mark where you need to sew. The top and bottom chalk lines should be about 1/4 above and below center line. Baste the centre line in place to prevent any movement during sewing.


Once you have marked it, you will need to machine sew along the chalk line as shown.
You will need to tack each end to prevent the pocket stitching coming loose.


Ok if you have still got all your fingers, well done!
It should look like this.


Once you have sewn, you will need to cut the cloth as seen below.
Here you cut the smaller cloth, with out cutting the main cloth (cut in the center).


You must take great care NOT to cut what you have just sewn see below when cutting the corners!!!


You now need to press the ends of the pocket as below.


Well done!
Once you have done this, you will need to open the seams.


Do the same on both sides as shown below.


You now need to pull the cloth through the back of the jacket as below.


Now baste the jettens as seen below, try to make sure they stay the same width 1/4 inch.


Once you have done this turn the cloth over and press, spend the next two days telling your self how easy it is!!!


Thursday, 2 May 2013

hard tailoring


Hard Tailoring

The major difference between hard and soft tailoring is the construction. Hard tailoring features angular shoulder pads and stiffer materials which give the garment its structured shape. To create these silhouettes, the supporting fabrics that line the garments are just as important as the fabrics used for the garment's outer shell. Stiff linings keep collars sharp and sometimes reinforce the bodice so that it is more constrictive. Bottoms that match this jacket are usually equally tailored -- often close-fitting, trousers and skirts have centre creases, darts or seams.

Soft Tailoring

To achieve the more feminine look of soft tailoring, the shoulders have little to no padding, so are rounder. Softly constructed clothing can also be oversized; an example is the "boyfriend" jacket. Many times soft tailoring forgoes heavy interfacing, allowing the shell fabric to fall free and move with the body. Bottoms that accompany this suit can include wide-leg or loosefitting trousers and wrapped, a-line and softly draped skirts.

Perception of Tailoring


Because hard tailoring tends to draw its inspiration from men's and military garments, the clothing usually is more severe and masculine. Softer garment construction is usually associated with femininity, and as a result, these tailoring techniques can have an impact on the way people perceive a woman . Female political figures often use tailored garments to help communicate their objectives, according to the "Vogue" article "Fashion Politics." Powerful women, including Hillary Clinton, have used hard tailoring as a symbol of strength, while the First Ladies of the United States and France, Michelle Obama and Carla Bruni-Sarkozy, have leant towards softly tailored suits and garments, expressing a more feminine style.

Wednesday, 1 May 2013

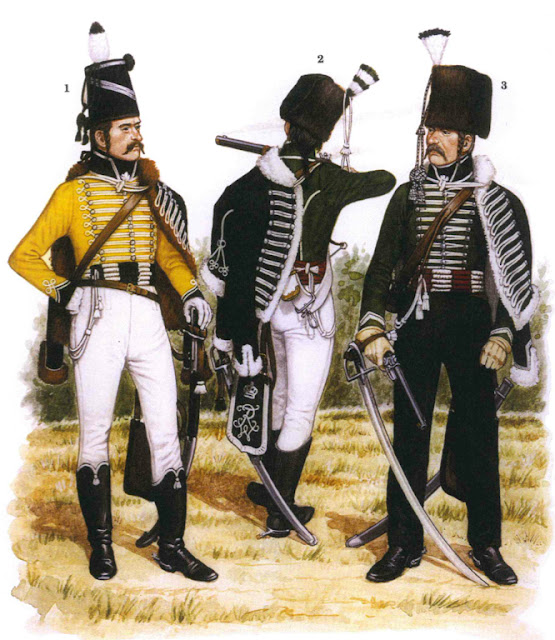
Prussian Hussar info


This information is taken from the book The Prussian Cavalry of the Napoleonic Wars 1792-1807 by Peter Hofschroer 

Hussar Headwear

Headwear was either the Colpack or the Mirliton. Shakos were introduced in 1804, and in the 1806 ‘campaign’ a mixture of headwear was apparent. The hats worn by Regiments No. 1 and 4 were 11 inches high and Regiments No. 2,3,9 and 12 were 12 inches high. A plume was fixed on the right side of the hat. For troopers it was white, NCO’s had a black tip, and Carabineers wore white with three black rings. The officer’s plume was made of heron’s feathers and had a black base. The cords ran around the hat and two tassels hung on the right hand side. The officer’s hat cords were gold or silver, depending on the colour of the frogging on their uniforms. In  1796 Colpacks were abolished and replaced by Mirlitons with a small folding weather flap or peak on the front. Cords and plumes were similar to those worn on the Colpack. Although the shakos of the Russian style were introduced o 1804, most regiments went to war in 1806 in their old Mirlitons. The colour of the shako cords was used to distinguish the squadron within a regiment.
Hair was long and plaited, weighted with pistol balls. Moustaches were permitted and were grown by almost every Hussar.

1. NCO; Hussar Bn. No.11, 1792-1804
 2. Carabineer, Hussar Regt No.1, 1794 
3. NCO; Hussar Regt No.1, 1794

1. Officer, Hussar Regt No.5, 1806 
2. Officer, Hussar Regt No.7, 1806 
3. Trumpeter, Hussar Regt No.2, 1806-07 

Hussar Dolman

A Hussar Dolman was a highly decorated garment. The collars and cuffs were coloured in some regiments, and in others they were the same colour as the body and marked only by trim. This trim also ran down the front of the dolman and around the tails. The pocket and back seams were also trimmed, the designer of the trim varied from regiment to regiment; officers had gold or silver trim. There were between ten and eighteen lines of frogging with three to five rows of buttons, brass or tin according to the colour of the frogging. From 1800 the cut of the dolman as altered slightly, the collars becoming higher and the tails shorter.

1. Sgt. Major, Hussar Reg No.8, 1806 
2. Trooper, Hussar Regt No.7, 1806 
3. Trooper, Life Hussar Regt. Rudorff (No.2), 1806

Pelisse

The Pelisse is a fur-lined jacket, which is similar in cut to the dolman. The fur at the collar or cuff was normally black or white. It was worn over the left shoulder on parade, attached by a cord. Depending on the time of year, either the dolman or the pelisse was worn.

Barrel-sash consisted of a bundle of cords fixed together and wrapped around the waist several times. It was worn only over the dolman. Officer’s sashes were made of silver cord ‘shot with black’.

Trousers were made of white kid leather.

Overalls had piping in the colour of the frogging, and were worn over the trousers. Cloth trousers were worn in winter. Buttoned up overalls were also worn, and the colour of the piping was used to distinguish the squadrons within a regiment.