Battledress - The uniforms of the Worlds Great Armies 1700- present by I.T Schick
The Regency by Marlon Sichel
Mens Graments 1830-1900 - A guide to pattern cutting and tailoring by R. I. Davis
European Milirary Uniforms - A short History
The anatomy of costume by Robert Selbie
Prussian Cavalry of the Napoleonic Wars 1792-1807 by Peter Hofschroer
Tailoring of the Belle Epoque by W. D. F. Vincent
Men's 17th and 18th Century Costume, Cut and Fashion by R. I. Davis
The Cut of Men's Clothes 1600-1900 by Norah Waugh
Arms and Uniforms - The Lace Wars by Liliane and Fred Funcken
Uniforms of the Naopleonic Wars by Digby smith
Friday, 31 May 2013
Thursday, 30 May 2013
My Journey so far
There has been a fair few positives and negatives during this whole process, however when I compare myself at the very beginning to where I feel I am at now in regards to knowledge and understanding of a new trade I feel that I have managed to gain much more than I had expected. I didn't always get the answers that I wanted, however I shouldn't disregard all the interesting facts that I had come across that I was not planning to find out in the first place. Military Tailoring is a very difficult industry to pry in to, and I didn't make it easy on myself. However, as a project mainly built as an investigative enquiry I fell that I have definitely made a successful amount of process. I was not expecting to be an expert on the subject by the end of this journey, but I now have a great deal of information on suppliers as well as tailors in the industry that I can always revert back to if I ever choose to continue this project in the future. It has been a very challenging module, which in a way I have been very glad of, because I can now feel some sense of satisfaction as I didn't 'take the easy way out'. I feel that I have only scraped the surface, and I have so much more to learn, and this project is by no means a finished product. I plan to make progress as well as finish my tunic in the near future.
Wednesday, 29 May 2013
Kapok Fabric
I decided to do a little research in to Kapok Fabric in regards to what was mentioned during my talk with Graham Hunter. He mentioned that Kapok fabric was used for military uniforms, however I did not catch what specifically for. This is what I came across:


Kapok fiber's essential
attributes are many: buoyant, resilient, moisture resistant, vermin resistant
and smooth, kapok possess powerful performance in a lightweight package.
It 's said that kapok fiber repels water like rain on a ducks back. When a
substance does this we call it, hydrophobic. This hydrophobic quality results
in the quick-drying, buoyant and moisture-resistant properties, which makes
kapok fiber remarkable among natural fibers. Kapok fiber supports as much
as 38.6 times its own weight in water. Buoyancy is lost slowly; with one test
showing only 10 percent loss after 30 days of water immersion. No other natural
fiber is better than kapok for water-safety
equipment. When kapok fibers are put under tension they completely
return to their original length when the tension is removed. Kapok fiber is
devoid of nutritional content thus kapok fiber is vermin resistant. Kapok
fibers are smooth and missing the scales of animal hair so it won't mat or felt
easily. It weighs only one-eighth as much as cotton, is as warm as wool and is
as smooth as silk.
http://archive.paradigmoutpost.com/kapok/kapok-fiber/properties-of-kapok-fiber-fibre


I can only assume that this fibre was used as a type of padding, as when I look it up it says:
Kapok has been used mainly as stuffing, as in life jackets, pillows, and mattresses and is not manufactured as thread or fabric.
http://www.botgard.ucla.edu/html/botanytextbooks/economicbotany/Ceiba/
Tuesday, 28 May 2013
A talk with Graham Hunter
I arranged a trip over to the Britannia
Panopticon to meet Graham Hunter. Graham has a wide range of knowledge within
gents period garments and owns one of the largest collections of period
garments in the UK. He has been very helpful with letting me in on some of his
vast knowledge on Military Uniform, and seemed very keen himself to teach
others about something that he has such a great passion for. I am very grateful
for this visit because it has been interesting to hear information first hand
from someone that can ultimately verify these facts.
The first thing that Graham mentioned was
the company Gieves and Hawkes. This
is a company that I have already come across during my previous research. As
well as this, a good company for uniform embroidery is Hand and Lock. This is a company that I will have to research in
to. He also mentioned Hainsworth, another company that I has already come
across and ordered fabric from, which makes me think that the research that I
have done previously has been quite successful if I consider it to be of a high
standard from a practitioners point of view.


The pointed angle shape of the elbow is quite typical to find on a military jacket. you can also see how to chest on this tunic protrudes out, and as this is an officers outfits it has quite a bit of padding in this area.
 |
| silk lining |
Uniforms copied civilian coats, and had a
very similar cut. This is why you can apply period tailoring techniques to
military uniform construction; it is all the same type of tailoring. Most
uniforms would have been imported from Britain to around Europe. During the
Victorian period, interlinings were more common than during the Regency period
when there was less detail, and possibly only padding at the front. Chest
canvas has been used for a long period of time as a structural piece to remove
any hollows on the chest. Graham mentions ‘Kapok’ fabric, which is another
things for me to investigate in to. Most
officers’ coats would be lined with silk, and facings where of wool, possibly
doeskin. Graham mentions that with some of the coats that he has come across he
has found leather, very similar to kid leather, behind the facings between the
lining and the fabric. He says that this band of leather would be used to stop
the edges from curling and keep everything flat and looking perfect.

I also noticed that at the bottom of this
particular jacket there was a leather facing at the bottom, which is very
interesting as I have no come across anything like this yet. I can imagine that
this is definitely a dress uniform of an officer because of the quality of the
fabrics, and also the leather facing gives it away. I asked about pocket lining
and Graham said that it would have been either linen or basic cotton. I do
believe that modern approaches use Holland linen to line the pocket, which is
still similar.

Shoulders were always set back, this is a
traditional style which isn’t used to the same extent in modern day suits. But
some companies such as Gieves and Hawkes still like to keep they authentic look
with their suits and still have set back shoulders.
Graham let me have a look at his samples
from Hainsworth. Most of the samples were the same as mine however I did not
receive doeskin samples, he mentions that if you want to be proper authentic,
doeskin is the type of fabric you would go for, as it was used during the
regency period as well as the Victorian. There are many different names for all
the different types of wool that could be used when reconstructing a period
garment such as melton, pilot cloth, however, twill is a modern type of fabric
and is more unusual. It wouldn’t necessarily be used for a period tunic from
the 18th Century Napoleonic wars.
Here are some really interesting facts
about uniforms:
Lapels in suit jackets came from Napoleonic
military tunics. When the officers were too warm they would unfasten the top
buttons on their tunics and would then fold the tunic tops open to create what
we would call lapels today. This then became a popular fashion trend for men’s
jackets ever since.
Another interesting bit of information,
whether it is true of not, is that the reason you find buttons on cuffs is
because when Napoleon found soldiers wiping their noses on their cuffs he
decided to put buttons on them to prevent the men from doing so.
The reason men’s clothing fastens left over
right, goes back to when soldiers used to draw their sword from their left
side, therefore it was practical for their jacket to fasten left over right so
as to prevent the jacket edge from catching as the sword was drawn. Also,
because men used to have their servants dress them but the men would button up
their own garments, where as women would have everything done for them
including buttoning up their clothing. This meant that it would be easier for
the servant who was buttoning up the garment if the buttons fastened right over
left, hence why clothing for men and women are fastened in this way and still
are!
I told Graham that I have been finding it
difficult to differentiate between a costume piece and an authentic piece, and
he mentions that the easiest way to tell the difference is that all the
originals will have the original stamps on them.
In regards to the bottom half, the army
wore pantaloons rather than breeches to differentiate themselves from the
officers and the higher ranks. Officers wore buckskin leather breeches,
commonly white, towards the end of the Napoleonic wars. More commonly worn
after around 1815-20’s. Hussar trousers were a common type of fashion for
civilians around 1815 with the braided details around the pockets being
popular. As well as this, Hessian boots were very fashionable taken from the
Hussar uniform.
As I have already said, during the Regency
era there was less interlining materials used and generally only padding.
However, it was mainly the officers that would have padding rather than the
soldiers. A style of quilting used during the Victorian period Serpintine,
which I have similarly seen on some of the tunics that are in stock at the
Conservatoire. This answers my question as this must mean that these particular
tunics that I have examined are probably authentic.


This 1880’s lieutenant tunic has no
padding, has a basic thin canvas with a heavier canvas around the chest. It also
has Russia braid around the cuffs. Graham mentions that ‘everyday’ uniform was
not always padded, however full dress uniforms would definitely be padded to
give the puffed out chest look.

This one is an 1890’s practical uniform. It
is the simplest with no padding, no lining and no interlinings and
interfacings. The reason for this would be because it is used as a practical
garment that is worn everyday, there is no need to all the layers of
interlinings as it would be too hot for the soldier to wear and very
impractical. You can see as the years went on, how uniforms were developed for
practicality purposes rather than for the look. Fabric went down in quality in
the 1870’s due to the invention of the sewing machine, and uniforms were being mass-produced.
The early sewing machine stitch is called the ‘chain stitch’ which is something
that I didn’t know, and is what you would find on uniforms of that period.


Another interesting fact that I learnt is
that only officers would have shoulder pads in their tunics/coats, and it was
depending on the tailor whether he felt that his client needed shoulder pads.
For example, if the officer had weak shoulders or even a shoulder that was
significantly weaker than the other, the tailor would pad accordingly. This
also applies to the general shaping of the uniform, depending on the specific
build of the officer the tailor would judge the right amount of padding that
would need to be used in order to create the traditional look.
Nowadays, uniforms as well as replicas are
mass produced in India, as it is cheaper labour, as well as cheaper to do
metalwork. One book in particular that Graham showed was a book called
‘Uniforms of the British Army, Naval and Court’ by T.H Holding. It had some
very interesting picture of period style tunics, and he managed to photocopy
some images for me. This will be a book that I will definitely want to research
in to in future as it looked like it would be very informative for my research.
Graham mentions that my attempt to
construct a Hussar tunic is very ambitious for a first attempt, and that it may
be wise to start with a basic uniform first. I understand where he is coming
from, as I have already felt that this particular type of tunic is becoming
quite complicated to interpret, as well as very expensive to make. If I had
known this information sooner I probably would have chosen a much simpler style
to construct, however I have already started to make the pattern. It is just
unfortunate timing which cant be helped. I suppose these are the types of
issues that you can be faced with when not knowing much about a particular
subject in the first place. If I could go back I would have waited before
jumping ahead, but I suppose it was hard for me to know whether I was going in
the right direction or not. It definitely has been a learning curve for me, and
in future I will bare this thought in mind when I am constructing a garment
that I do not have much knowledge on. I will start with the basics before
anything else.
All in all this trip has been such a great
help in regards to my research, Graham is a very interesting man and I do hope
to keep in contact with him in the future. I am glad to have put myself out
there because now I have made contact within the industry for me to source in
the future if I choose to continue this project further,
Monday, 27 May 2013
More useful tailoring links
http://www.styleforum.net/a/the-difference-between-fused-and-canvassed-suits-explained
http://www.uniquepatterns.com/education/sewing-insider/72
http://malepatternboldness.blogspot.co.uk/2010/08/peter-destroys-dissects-barneys-suit.html
http://davidetaub.blogspot.co.uk/2012/04/my-old-apprentice-tailoring-pocket.html
http://tuttofattoamano.blogspot.co.uk/2010_05_01_archive.html
http://www.uniquepatterns.com/education/sewing-insider/72
http://malepatternboldness.blogspot.co.uk/2010/08/peter-destroys-dissects-barneys-suit.html
http://davidetaub.blogspot.co.uk/2012/04/my-old-apprentice-tailoring-pocket.html
http://tuttofattoamano.blogspot.co.uk/2010_05_01_archive.html
Saturday, 25 May 2013
Making the jacket
I decided to draft my own pattern for this project, because I liked the idea of challenging myself with trying to interpret the correct shape of a military tunic through my own personal knowledge and skills which I had developed. Constructing the jacket was not a necessity for this project, however I thought that I would like to display a little bit of what I had learned and introduce the starting point of my next step of this journey which will be continued after this module has finished. I plan to have achieved my appropriate pattern pieces through drafting a basic jacket block, and then through shaping the toile on the body to fit my models specific shape. I can imagine that this is actually done to some extent by tailors, however I plan to start with the basics
I would say that it is more of an experiment to help develop my skills and knowledge in pattern making, and so that I become accustomed to interpreting how structural garments such as a military tunic should shape and sit on the body.


I want to look at this experiment as I would if I were making a bespoke jacket for a customer as a freelance costume maker so as to get a bit of experience with what professional freelance work could possibly be like. I started by drafting a basic jacket block to my models measurements which was simple enough. The basic jacket block does not have any shaping to it, which essentially gives me a sort of 'blank canvas' to work from.


I am really impressed with the way that this fits. There are some areas that could do with a little more shaping in to the body however, I have to consider that there are many layers of thick fabric, padding and interlining that will be constructed together for the final piece. Therefore it would be wide for me to keep the shape and room for ease as it is to prevent problems in later on. It is difficult to judge whether the final fabric which I am using would sit in the same way as this canvas, because they are completely different types of thickness and weight. Ideally I would have used fabric that it more similar to the Pilot cloth fabric which I will be using for the final tunic. However, I did not have the luxury of spending lots of money on other fabric as the Pilot cloth itself was expensive to purchase. This meant I would have to make compromises in other areas, plus, canvas is much more accessible. For example, instead of purchasing new canvas I managed to take apart other toiles that I had made from other projects and use that material which saved me money. I think that it is important as a costume maker that works to a budget to interpret the necessary from the issues that can have alternative routes. Using this typical canvas fabric just meant that I had to keep the size slightly bigger rather than too small, so as when tack together the final fabric panels together I can adjust them to a better shape if necessary.


I would say that it is more of an experiment to help develop my skills and knowledge in pattern making, and so that I become accustomed to interpreting how structural garments such as a military tunic should shape and sit on the body.

My inspiration is primarily from the 7th Regiment French Imperial Hussars 1812. This photo is of a Captain of the 7th Hussars, however I am not planning to include the captains chevrons on the cuffs, and rather it being one chevron or a russia braid design such as the one that I had practised prior.
The dolman will be dark green, the cuff and collar will be red, and I am planning on having the lace & buttons gold rather than yellow.
I want to look at this experiment as I would if I were making a bespoke jacket for a customer as a freelance costume maker so as to get a bit of experience with what professional freelance work could possibly be like. I started by drafting a basic jacket block to my models measurements which was simple enough. The basic jacket block does not have any shaping to it, which essentially gives me a sort of 'blank canvas' to work from.
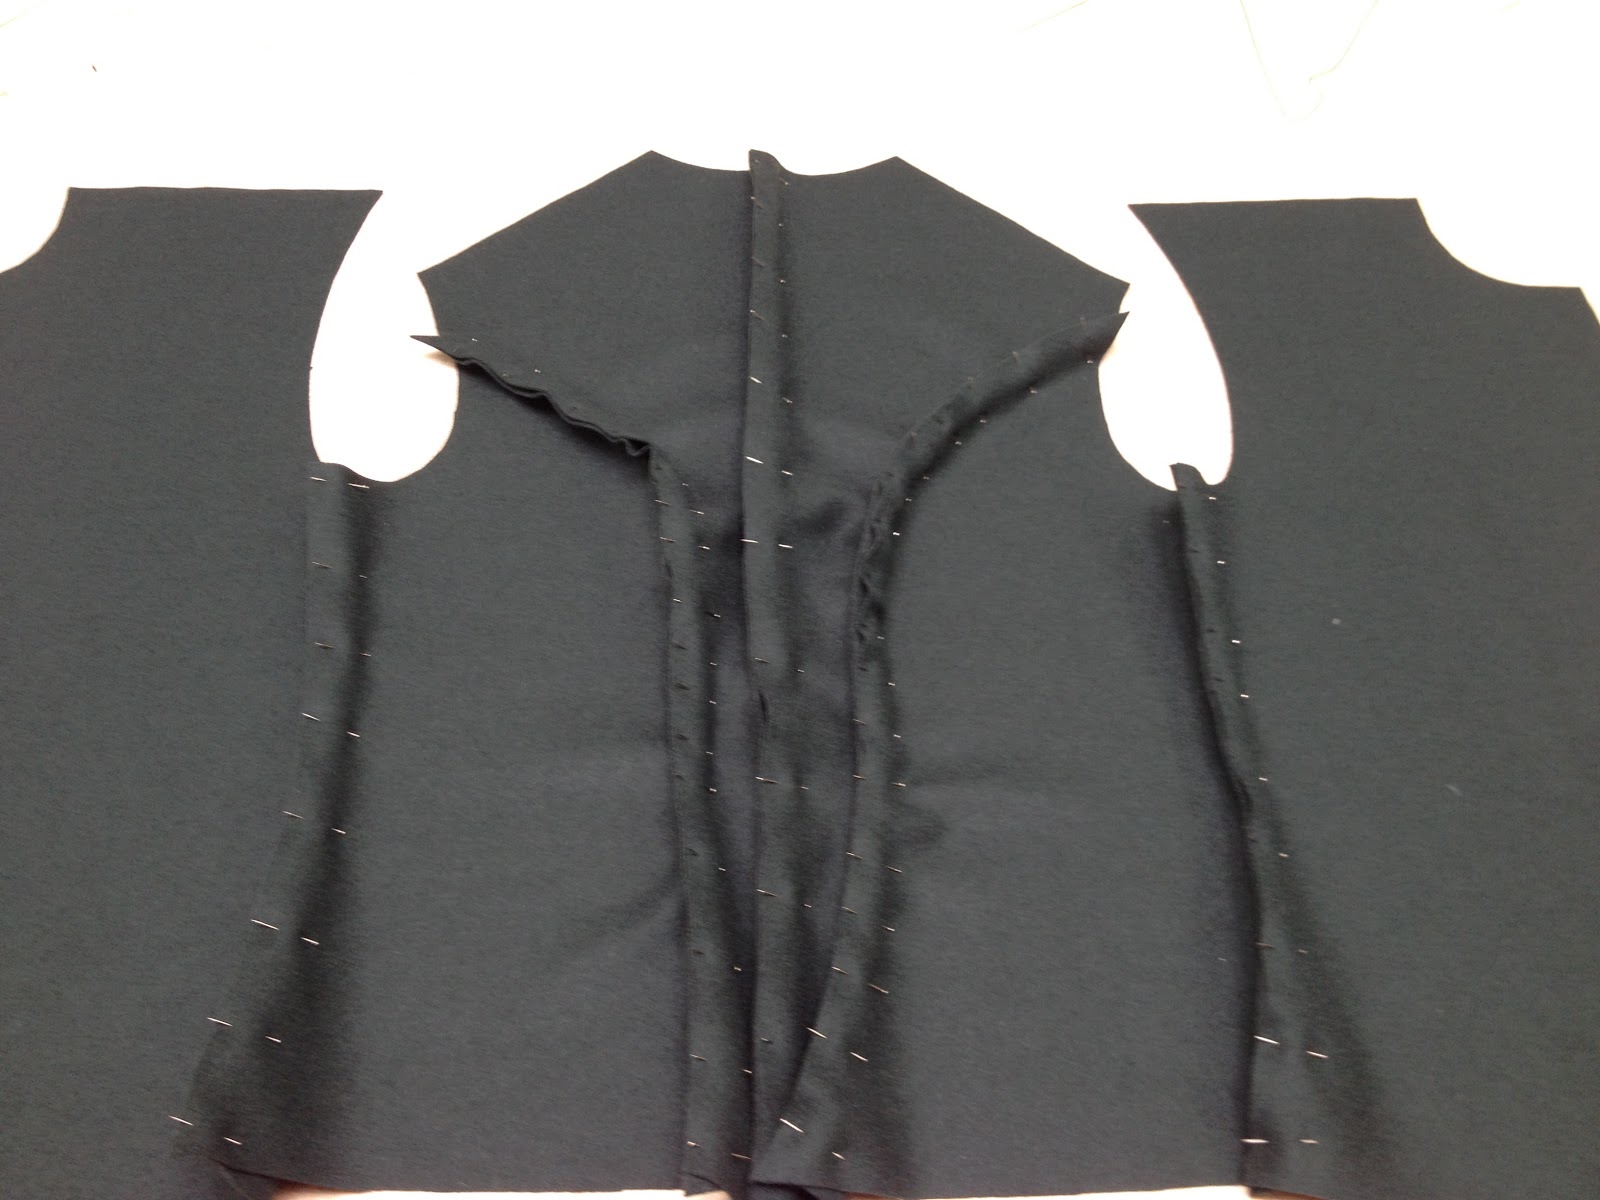
Toile No. 1

Toile No. 2
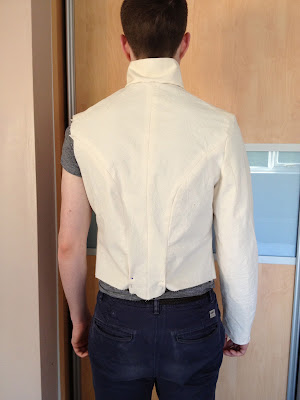
Once I had altered my pattern pieces I produced the second toile. You can see how I have created the point at the front of the tunic, raised above the hips and shaped again at the back to a more subtle point. I decided to go for a shorter style of tunic, as when I refer back to the way in which they sat from looking at photos from the Napoleonic period, the dolman sat almost above the hips. This would be due to the dolman needing to be shorted than the pelisse length which would potentially be worn over the dolman of not fastened over the shoulder. I've looked at many different styles of a hussar jacket; some styles are considerably more like a jacket that is of a jacket length, however this was not the look that I was going for. I want the tunic to be much more shaped to the body.


I am really impressed with the way that this fits. There are some areas that could do with a little more shaping in to the body however, I have to consider that there are many layers of thick fabric, padding and interlining that will be constructed together for the final piece. Therefore it would be wide for me to keep the shape and room for ease as it is to prevent problems in later on. It is difficult to judge whether the final fabric which I am using would sit in the same way as this canvas, because they are completely different types of thickness and weight. Ideally I would have used fabric that it more similar to the Pilot cloth fabric which I will be using for the final tunic. However, I did not have the luxury of spending lots of money on other fabric as the Pilot cloth itself was expensive to purchase. This meant I would have to make compromises in other areas, plus, canvas is much more accessible. For example, instead of purchasing new canvas I managed to take apart other toiles that I had made from other projects and use that material which saved me money. I think that it is important as a costume maker that works to a budget to interpret the necessary from the issues that can have alternative routes. Using this typical canvas fabric just meant that I had to keep the size slightly bigger rather than too small, so as when tack together the final fabric panels together I can adjust them to a better shape if necessary.

I decided that due to the shape of my model, I wouldn't create as much of a pronounced chest as traditionally. There is a slight shaping to the centre front, which I found to sit better than any more unnecessary shaping. I decided to take the route of fitting the jacket to the models own shape rather than focusing on general shaping that I have found on period military tunic patterns. Although they are a great help towards my judgement calls, it is important to realise what suits your client best, which is what I learnt from Graham Hunter.

I swithered about having a back seam, because when I investigated in to different tunics I noticed that most of the time there isn't one. However I personally preferred the look of many different panels at the back. If I were making this costume historically accurate I would be more inclined to specify whether this is an element that I could definitely incorporate in to my garment or not. However, I look at this as more of a trial to see what stage I am at exactly when it comes to constructing a jacket of this nature, and realise what steps I would need to take and consider in future to develop my skills even further and to an even more professional level.
Due to factors out with my control I was not able to continue any further with the tunic. This was because my Russia braid which I had ordered three weeks ago still hadn't arrived. Even after there being a 5 working day guarantee delivery and sending countless emails, it goes to show you can't always foresee issues that may arise. This has had a knock on effect in my progress because I cannot yet construct the tunic without having stitched the braiding on to both tunic fronts as singular pieces. Having the fronts flat and detached makes the positioning and stitching of the braid much easier rather than if the jacket was completely constructed together.
This wouldn't be ideal if I were making this costume for a customer that needed it by a specific deadline. However, this process is about trial and error, and I have learnt that in future this particular company isn't necessarily reliable for their time keeping and it might be wise not to order from them in future. It has been a difficult journey for me because in this context because I haven't experienced making a costume of this style before therefore I have had little knowledge on fabrics and suppliers. All the knowledge that I have gathered has been through investigative means and has taken a long time to culminate. However, the good thing about this project is that it has let me experience what it is like sourcing and buying from suppliers, as well as being able to start building up samples and a network of suppliers that will be of great use to me in the future. I think that it is very important as a costume maker to accumulate a list of reliable suppliers as well as a samples book so that in future it will be much simpler process due to this previous investigative experience of. As I said, this project has mostly been about investigating other than anything else, so that for similar future endeavours I will have a clearer starting point and route to go down. This means that in future it will be much easier for me to plan exactly when and where to purchase fabric from so as that I can expect and rely on everything arriving at the right time. It has been a valuable lesson in time management, and how crucial this is when making a costume for a customer.
Thursday, 23 May 2013
A Chat With Graham Hunter
I have recently been in contact with Graham Hunter, who works at the Royal Britannia Panopticon in Glasgow, via email in regards to military tailoring. Graham has been collecting period garments for over thirty years. Graham has one of the largest collections of period costume in the UK and his name can been seen at the end credits of such films as "Arragon" and "Last King of Scotland" as well as TV programmes such as the popular "History of Scotland".
I managed to chat to him over the phone about his insight
in to military uniforms and they construction. Major problem these days is
finding good quality fabric for reconstructing period military jackets. For a
costume that he most recently made he had to order the fabric in from Paris
which was not cheap. He says that personally he is very pedantic about
authenticity and accuracy. The problem
is if the give a pattern to a modern day tailor, they will make the uniform
with modern techniques. Graham states that from what he can gather from over
his years of collecting, the method in which a tailor constructs a military
uniform is entirely down to their own personal preference. There is no right or
wrong way, as long as it creates the desired effect. He says that if you look
at 18th century tailoring, you can find that some uniforms have quite
poor quality stitching, in comparison to Victorian uniforms due to the
invention of the sewing machine. However in saying this, Officers costumes
usually are beautifully made.
He mentions how
difficult it is to find broadcloth and wool Melton of a good quality and of a
reasonable price. Not to mention how all the trimmings and braid are extortionately
priced as well. It is a difficult project to make a costume completely
authentic unless you have the money. I have found this to be very true along my
journey, even if being made as a costume piece. He mentions ‘’ who are company
providers of fabric for many period films such as Master and Commander.
Before the 18th century most linings were made
of rough cotton or even linen, it wasn’t until later that cotton sateen lining
was used. Sometime officers coat linings were made of white silk, and coat tail
linings were generally a wool fabric.
We have arranged a meeting at the Panopticon in a couple
of days where he will show me some of this military tunic collectable items, which
should be very interesting.
Wednesday, 22 May 2013
Lambswool research cont.

I managed to pick up some thin wool interlining that resembled lambswool linen used as interlining. This particular wool is fusible, therefore it is a more modern approach to interlining. As lambswool linen is very difficult to get a hold of, fabrics such as the one above must be the more up to date and cheaper alternative to traditional interlining.
I also did a little bit of research through the Whaleys samples again to see if I could find anything, and came across some options that were similar however not quite the same.


I then found this 'Voltaire Wool Fine Natural' which was almost identical to the fabric inside the tunic. However when I went to check the price it was £15.68 excluding VAT and postage. It is something that I cannot afford to buy a metre of at this moment in time, therefore I will look for other options which still would do the same job such as the mandors fabric which was £3.99 a metre. When to take in to conderation everything else that I have to purchase, the cheaper fabric would be my better option. Sometimes you have to compromise when you have a budget. Ultimately, this fabric is not a crucial necessity to my construction so I guess having lambswool as another layer of interlining could be taken out of the equation. However, it would still be good to have as an example of research.

Tuesday, 21 May 2013
Reflecting
Ordering fabric for this project has been a really tricky task for me to do because of all the researching and sourcing I have had to do beforehand. I have had to interpret everything for myself without the help of an expert to guide me. Most of my time has been taken up by this stage which has has a bit of a knock on effect in regards to me being able to do any practical construction work. A lot of this had been based on guesses and judgments that I have had to make in order to progress. No one that I have contacted had been able to provide me with any advice on the practical skills therefore my main source has been through examining costumes and hoping that what I am doing is right. You could say that a lot of this project has been a success in regards to how much I have researched, but you could say that it hasnt been as successful as I'd hoped it would be as I am not as far ahead as I expected to be at this stage. When you dont know what you are doing, researching in front of a computer screen as well as reading books is going to take it the majority of the time, and I did not anticipate this from the beginning. I thought it woukld be easier to find this informationn than it has been. I suppose this has all been part of the learning experience, however, I will not completely know what skills and materials are correct unless I am able to talk to a uniform tailor myself which is harder than it seems. I have taught myself to go down other routes to find what I am looking for, and even if I havent been as successful as I'd hoped I have still learnt a lot about perseverence and patience. This has been a very long journey and I dont intend to give up now.
Comparing fabric
The more I examine the tunics from stock, that the more that I get familiar with all the different materials, the more I start to notice how there are differences in what I would assume to be used and what is actually used. For example, the hair canvas that I have found in a couple of the tunics that you would assume to be stitched to the chest does not look like the chest canvas that I have sourced. when looking at it I wondered if this was mabye another type of canvas that I had not come across yet, however, the fabric actually looks more like a thick linen when I compare it to the Whaleys samples.


Linen has been mentioned a lot through my research as a layer of interlining, however it confuses me to think that it is used in the way chest canvas would be used. This leads me to think that there is no right or wrong way of constructing interlining fabric. There is not set fabrics that have to be used when interlining a tailored jacket, there are more options that you think. Or using linen in this fashion may be for particular types of tunics or from a particular era. As long as the fabric is doing what it is supposed to, then thats what matters. I suppose different tailors have their different preferences. It is hard to know whether I am right in saying this because I have unfortunately not some across a direct source of information yet which has led to this whole guessing game. I have ordered some samples for my folder.


Linen has been mentioned a lot through my research as a layer of interlining, however it confuses me to think that it is used in the way chest canvas would be used. This leads me to think that there is no right or wrong way of constructing interlining fabric. There is not set fabrics that have to be used when interlining a tailored jacket, there are more options that you think. Or using linen in this fashion may be for particular types of tunics or from a particular era. As long as the fabric is doing what it is supposed to, then thats what matters. I suppose different tailors have their different preferences. It is hard to know whether I am right in saying this because I have unfortunately not some across a direct source of information yet which has led to this whole guessing game. I have ordered some samples for my folder.
Another layer of interlining - lambswool


I bought this muslin mandors thinking that it was the same as the layer of interlining above. However, form seeking some advice from Cate we have come to the conclusion that this fabric is wool based rather than cotton based like the muslin that I sourced.
After some research in to what exactly this fabric could be, I came across some information from the book 'Tailoring - the Classic Guide to Sewing the Perfect Jacket' which I have been using a lot as a source during this project. This fabric could potentially be lambswool interlining as this is used as another layer to keep in the warmth. From what I have seen, the lambswool has been stitched on to the wadding rather than the top fabric. I decided to do a little sample with the muslin and some poly wadding just to get an idea of the look, however if I can I would would to try and purchase some lambswool interlining to have the correct type of sample.

http://www.scarlet-letter.com/linens/40lambswool.php is a US site that sells the fabric $70 per yard! What I can gather from this is that this fabric must be something that is very hard to get hold of, as well as it being a very traditional type of interlining that isnt necessarily used in modern times. I could be wrong about what this fabric is, but ulitimately this is all part of the learning journey.
http://thesewingdivas.wordpress.com/2009/03/24/sewing-with-fur/ I found this link, which has some good photos of the use of lambswool in an old fur garment. I shows it use in the collar as well as on the body.

Waiting for Samples
A lot of time on this project has been spent waiting for samples to arrive that I have ordrered from various companies. Because of the fact that I am researching in to fabric rather than knowing exactly what to purchase, I am not going to spend money on an item without having samples delivered first. I don't want to make the mistake of ordering materials that I think is approproate to then find out that I have spent a lot of money on a product that isn't what I was looking for, so it seems like the more sensible thing to do. The problem with this is that some of the companies that I have ordered from have been behind on their deliveries, which has then had a knock on effect on my time schedule as I have not been able to purchase some of the main materials that I need in order to progress. I have been sourcing fabric from many different sites, as well as mandors and comparing the prices, but it isnt they same as having a physical piece to touch and analyze. This process has taekn much longer than I'd expected as I did not take in to account that fact that there might be problems like these along the way that would ultimately affect my schedule. If I was to go back I would have given myself more time to research fabric earlier in the project so that by the time I cam round to construction I would have everything ready for me to start stright away. However, as I said before, it has taken me a long time to research in to materials therefore I couldnt really have ordered samples any sooner than I did. I think that in future this it an aspect which I will have in the back of my mind when I am planning to order material for a project, I will make sure to give myself plenty of time so that I am not waiting around and so that it doesnt put my time schedule out of sync. This has been quite a significant learning point about organisation which I will take on board for future projects.
Monday, 20 May 2013
Rushing ahead
I am very annoyed at my sitation right now because I ended up spending a full day working on the pattern block for my tunic, for me to then find out that I had made a crucial mistake at the very beginning. This then had a knock on effect when I stared to draft the sleeve, it was at this point when I knew that something wasnt quite right as the sleeve head was way too wide and short. I then ended up spending a substantial amount of time trying to suss out the error, which eventually appeared at the first instruction to add 4.5cm to the scye depth, which I did not do.
I think I am more annoyed about the fact that my time is very limited as it is and I dont want to be making silly little errors which I shouldn't really be making in the first place as a third year student. I am annoyed at myself for rushing ahead and not reading over the instructions more carefully. This could have been avoided, and the lesson learnt here is it is always better to read things twice as the mistakes that you make can effect your process later down the line. In regards to the style of costume that I am making, because of military uniforms being so precisely made not to mention the price of the material being rediculously expensive I cant really afford to make these sort of mistakes. I have decided to start again tomorrow, and I will make sure to take my time with the new pattern as well as with all the other parts of the process.
I think I am more annoyed about the fact that my time is very limited as it is and I dont want to be making silly little errors which I shouldn't really be making in the first place as a third year student. I am annoyed at myself for rushing ahead and not reading over the instructions more carefully. This could have been avoided, and the lesson learnt here is it is always better to read things twice as the mistakes that you make can effect your process later down the line. In regards to the style of costume that I am making, because of military uniforms being so precisely made not to mention the price of the material being rediculously expensive I cant really afford to make these sort of mistakes. I have decided to start again tomorrow, and I will make sure to take my time with the new pattern as well as with all the other parts of the process.
Sunday, 19 May 2013
Sleeve investigations
Shoulder pad examples:


You can see here that these are very modern types of shoulder pads with the use of modern materials. It is said that should pads originally were made from horsehair. I can see myself making me own shoulder pads with the left over wadding from the lining so that I can have padding that is the correct shape and thickness needed for this particular coat. My plan is to gauge this during my next fitting.

I came across these examples of should padding and sleeve heading. From what I can gather these have been removed from old suits are are very interesting to investigate.

The use of canvas/linen to give the heading extra structure.

This looks like hand stitching to me.
I decided to do a practise shoulder with scrap wool fabric before I proceeded to the cutting the final sleeve. I thought that this would be a wide choice because of the fact that some materials sit differently when cut, in my case I knew that that there was a chance that wool would compared to the canvas toile fabric. If theres anything that I've learn't it is better to be extra cautious when insure of the circumstances.
 |

I thought I would pin the should pad in first to look at the shape that it gives. From what I can see it creates a good amount of thickness. This may be the right size of padding that i'll ultimately need for the final garment. I also decided to buy sleeve heading from mandors; thats good about this stuff is that it has a layer of stiffened canvas which gives it an even better structure.


Having the sleeve heading and the shoulder pad has added alot of extra structure and thickness, but my main concern is how much would actually be needed for this particular size and style of garment. It is difficult to judge when I don't have my model in call whenever I need him.


Unfortunately the sleeve head test did not go the way I was expecting. Instead of the sleeve head sitting with a lip, it fell below the shoulder seam. I eventually came to the conclusion that it must have been because there is not enough ease in the sleeve. This does make sense because I felt that there could have been slightly more ease when putting the toile together however I didn't see it as an issue as the time because it looked perfectly fine during the fitting. However, this is a prime example of how fabrics can sit differently due to their nature e.g thickness in this case. I made the right decision in doing a tester because I now know what would have happened if I hadn't, I would have wasted very expensive fabric. In future I will be more inclined to make this choice as it will help my journey in the long run by correcting mistakes before it becomes too difficult to do so. Another issue could be that the thickness of the shoulder pad and the sleeve heading combined with the fabric actually creates too much bulk causing the sleeve to lie flat and pulled with no room. The next step is to reconfigure the paper pattern adding more ease before I progress to cutting the final sleeves.
These are some very formative links that I have come across in my research that guide you with how to set in a sleeve which will be very useful for me for the future progression on to the final piece.
http://www.flickr.com/photos/7370831@N07/5418961364/in/set-72157625924156568/
http://everythingsewing.blogspot.ca/2011/11/setting-in-sleeves.html
http://thesewingdivas.wordpress.com/2008/10/09/sleeve-heads/
http://www.flickr.com/photos/7370831@N07/5178543224/in/set-72157625253865870/
http://tuttofattoamano.blogspot.co.uk/search/label/sleeves
very interesting video to watch:
https://www.youtube.com/watch?v=Qps2Uy4qSWw&feature=player_embedded#at=134
Sample of cuff decoration.


Ideally I would have prefered to have used my Russia braid for this sample however there still is no sign of its arrival. I would like to use this decoration on my final costume piece... I like the idea of it being quite simple but still an interesting decorative piece.
example of cuffs
As I have already stated, this outfit is not going to be historically exact as I feel that it is important for me to investigate..


As you can see these Hussars captains from the 7th and 8th French Regiments have rows of Chevrons as a symbol of their high status in the ranks. However, I personally feel that I should approach this aspect in a more simplistic way due to factors such as budget; these laces are barely affordable for a student therefore for me in this present time I would work out much more affordable for me to use Russia braid only. If I were going for authenticity I would know what I would need to do in future, but as this is an experimental first time recreation I know where my limits are.
Subscribe to:
Posts (Atom)